Coatings are the unsung heroes in protecting surfaces against wear, corrosion, and environmental factors. But how do we know if a coating is up to the task? Enter the Cross-Cut V-Cut test, a vital method to assess the strength of coatings on substrates. ✨
Reference Standards: ASTM D3359 and ISO 2409
Before we dive into the V-Cut test, let's ground ourselves with the standards that guide us:
ASTM D3359 by the American Society for Testing and Materials (ASTM): This standard offers guidelines for evaluating coatings' adhesion by making precise cuts through the coating layer down to the substrate.
ISO 2409 by the International Organization for Standardization (ISO): Similar to ASTM D3359, this standard provides a global framework for assessing paint and varnish coating adhesion.
Often V-Cut is utilized based on thickness (mostly >250 microns) and in some cases client, specification and paint manufacturer instructions are highly mandatory.
Preparation of the Specimen: Ready, Set, Go!
To conduct the Cross-Cut V-Cut test, you'll need a prepared specimen, typically a coated panel or substrate. Make sure it's clean, dry, and free from any contaminants that might influence adhesion. Also, ensure that the coating is fully cured because adhesion can vary during the curing process. ☀️
The Cross-Cut V-Cut Procedure: A Step-by-Step Guide
Step 1: Selecting the Right Tool
Begin by choosing a cutting tool, often known as a "multi-cutter." This tool features multiple blades arranged in a specific pattern for precise cuts. ✂️
Step 2: Creating the Grid
Use the cutting tool to create a series of evenly spaced cuts in a grid pattern. Typically, these squares are 1 mm x 1 mm, although dimensions may vary depending on the standard.
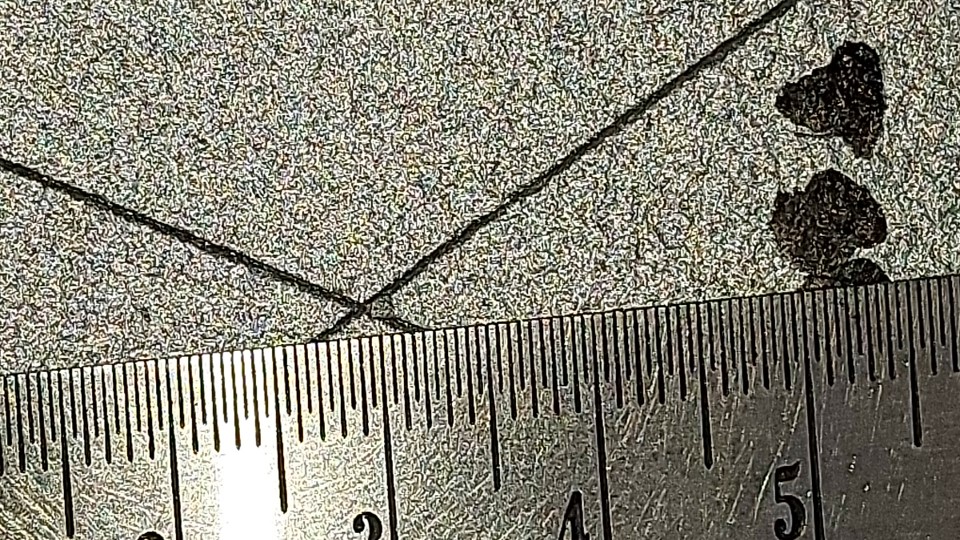
In the Cross-Cut V-Cut test, there shall have two cut until the bare metal with angle of 30-45 degree.
Step 3: The All-Important V-Cut
After completing the cuts, make a single V-shaped cut at the intersection of the grid lines. This cut should penetrate through the coating and reach the substrate below.
The angle of the V-cut is usually around 30-45 degrees, but it may vary based on the standard or specific requirements.
Step 4: Inspection
After making the cuts, thoroughly inspect the specimen for any signs of coating detachment, chipping, or cracking.
Use adhesive tape to firmly press against the cut area and then quickly remove it. This tape test evaluates the adhesion of the coating.
?️♀️ Interpreting Results: What Do the Ratings Mean?
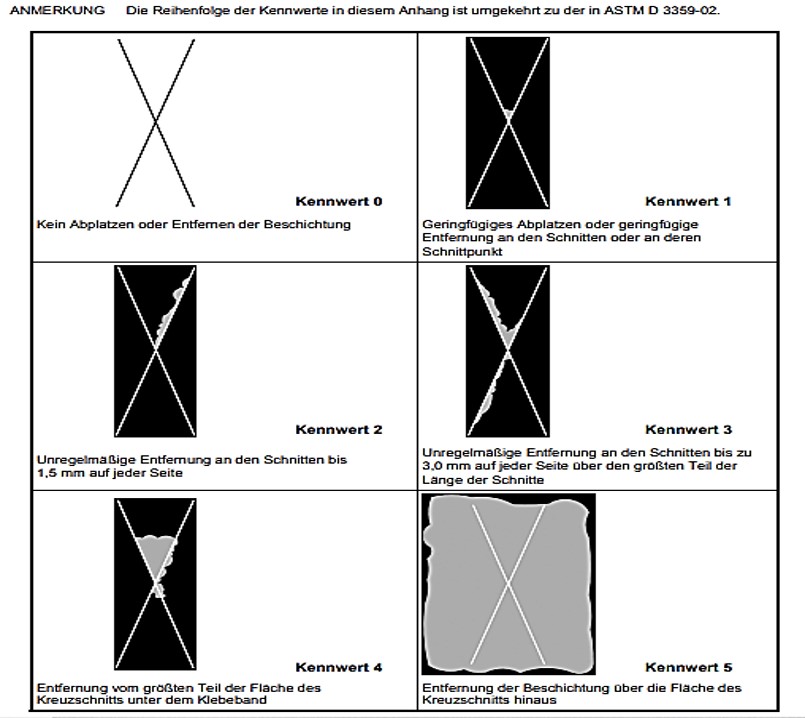
The Cross-Cut V-Cut test provides a qualitative assessment of adhesion. The level of adhesion is often classified on a scale from 0 to 5, however, it is high recommend to follow instruction from relevant standard to be follow:
0: The coating has completely detached from the substrate.
5: No coating detachment; adhesion is excellent.
The lower the rating, the poorer the adhesion. A rating of 1 or 2 may indicate a need for improved coating adhesion, it is clearly given in standard, and you must follow during site inspection. ⚖️
Conclusion: Ensuring Coating Excellence
The Cross-Cut V-Cut test is a powerful tool for evaluating coating adhesion. It offers valuable insights into a coating's performance and durability. By adhering to standards like ASTM D3359 and ISO 2409, you ensure consistent and reliable results.


Remember, the V-Cut is not the only factor in assessing coating adhesion. Surface preparation, substrate condition, and coating quality also play essential roles. But by incorporating the Cross-Cut V-Cut test into your quality control process, you can enhance coating performance and customer satisfaction.
If you have any questions about this test or need assistance with coating evaluations, don't hesitate to reach out to us. We're here to support your coating needs!


